Entering Cash Receipts
Use the Cash Receipts form to enter new batches of cash receipts or edit existing ones
Note: When you enter a debit invoice that is greater than the deposit amount, you must enter credit invoices first. Otherwise, the system generates an error.
Using Post and Clear Buttons
| • | Post: Click to post the cash receipts batch when the deposit is complete. |
| • | Clear: Click to save the cash receipts batch. The system adds it to the list of open batches at the top of the Cash Receipts form. |
Procedure
To enter cash receipts:
| 1. | Access the Cash Receipts form (found in the Back Office menu under Accounts Receivable|Action). |

| 2. | Use the form to edit a new or existing cash receipts batch and upload a file for import: |
| • | To open an existing batch, click the Batch ID in the Cash Receipts panel. |
| • | To start a new cash receipts batch, click New deposit in the Receipt Entry panel. |
| • | To open the Cash Receipts Import form to upload a file for import and view errors that occurred during cash receipts imports or view successfully imported rows, click the Import icon ( |
Note the following:
| • | This feature is only available for service providers. |
| • | Users whose user role is set to FULL or INQUIRY for the Cash Receipts form, but whose user role is also set to DENY for the Cash Receipts Import form cannot view the Import icon ( |
| • | Users whose role is set to INQUIRY for the Cash Receipts form can select the Import icon ( |
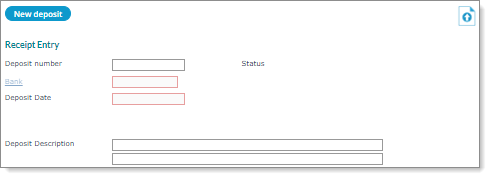
| 3. | The Deposit number populates automatically. You can edit it. |
| 4. | Enter the Bank ID. |
| 5. | You can enter the Deposit Date, or allow the system to populate it automatically with the current date. |
| 6. | Enter a Deposit Description, if desired. For example, you can enter the reason for the transaction or the actual date if it is different from the posting date. There are two lines that you can use. |
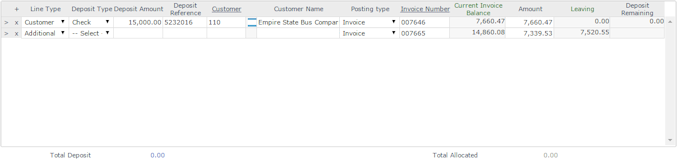
| 7. | Enter the initial Deposit Detail information: |
|
Column |
Description |
||||||
|---|---|---|---|---|---|---|---|
|
Line Type |
Select the appropriate deposit line type. The first line must beCustomer. If the deposit applies to multiple items under the same customer, use Additional to add more lines for the same customer and deposit. You cannot enter a different deposit type, amount, reference, or customer. Proceed to the Invoice Number field. |
||||||
|
Deposit Type |
Select the appropriate deposit type. |
||||||
|
Deposit Amount |
Enter the total deposit amount. |
||||||
|
Deposit Reference |
Enter the unique reference ID, which can include alphanumeric characters but not spaces. |
||||||
|
Customer ID |
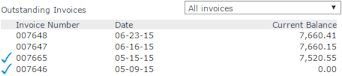
Enter the customer ID here. The customer's Outstanding Invoices display. |
||||||
|
Customer Name |
Defaults to the name associated with the Customer ID. Note: You can change this if the name on the check is different. |
||||||
|
Posting Type |
Select the appropriate type. Posting types are established on the Cash Receipt Rules form. Note: For invoices, select the posting type you configured for invoices. Otherwise, select the posting type defined for the transaction you are entering. |
||||||
|
Invoice Number |
Click an invoice number in the Outstanding Invoices list to add its information to the line. Otherwise, continue entering information.
|
| 8. | Review the calculated balance fields, and continue entering details as needed: |
| • | The Current Invoice Balance displays the total amount of the invoice. |
| • | The Amount value populates based on the deposit amount and invoice amount. |
If the deposit amount is the same as or greater than the invoice, then the amount is the same as the invoice.
If the deposit amount is less than the invoice, then the amount is equal to the remaining deposit amount.
| • | The Leaving column displays the remaining balance on the invoice. |
| • | The first row for the customer displays the Deposit Remaining amount, which is the difference between the amount and the total of the Amount column for the client. |
| 9. | If you are done entering invoice details, click Post. |
Otherwise, click Clear – the system saves your progress as an open batch at the top of the form.
