Writing Off an Invoice
You can use the Cash Receipts form to write off a customer invoice.

To write off an invoice on the cash receipts form:
| 1. | Access the Cash Receipts form (found in the Back Office menu under Accounts Receivable|Action). |
| 2. | Use the form to edit a new or existing cash receipts batch: |
| • | To open an existing batch, click the Batch ID in the Cash Receipts panel. |
| • | To start a new cash receipts batch, click New deposit in the Receipt Entry panel. |
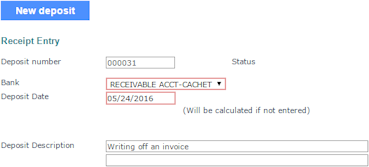
| 3. | The Deposit number populates automatically. You can edit it. |
| 4. | Select the Bank. |
| 5. | You can enter the Deposit Date, or allow the system to populate it automatically with the current date. |
| 6. | Enter a Deposit Description, if desired. For example, you can enter the reason for the write-off transaction or the actual date if it is different from the posting date. There are two lines that you can use. |
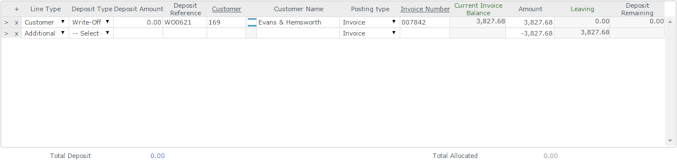
| 7. | Enter the initial Deposit Detail information as shown: |
|
Column |
Description |
||||||
|---|---|---|---|---|---|---|---|
|
Line Type |
Select Customer. |
||||||
|
Deposit Type |
Select Write-Off. |
||||||
|
Deposit Amount |
Enter 0.00. |
||||||
|
Deposit Reference |
Enter the unique reference ID, which can include alphanumeric characters but not spaces. |
||||||
|
Customer ID |
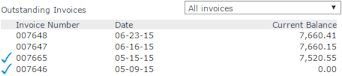
Enter the customer ID here. The customer's Outstanding Invoices display. |
||||||
|
Customer Name |
Defaults to the name associated with the Customer ID. You can change this if the name on the check is different. |
||||||
|
Posting Type |
Select the posting type for Invoices. |
||||||
|
Invoice Number |
Click an invoice number in the Outstanding Invoices list to add its information to the line. Otherwise, continue entering information.
|
| 8. | Enter a second line in the Deposit Detail panel: |
| • | Set Line Type to Additional. |
| • | Select the Posting type for write-offs. |
| • | Enter the negative cash value in the Amount field that "cancels" the total invoice amount. |
| 9. | Go back to the first line and enter the positive cash value in the Amount field to write off the invoice. |
| 10. | Make sure the Deposit Remaining displays as 0.00. |
| 11. | If you are done entering details for this posting, click Post. |
Otherwise, click Clear – the system saves your progress as an open batch at the top of the form.
