This page has moved and will no longer be updated. To access the current page, click the Online Help  icon in PrismHR or navigate to the new help docs site and search for your topic.
Processing Payroll
Use the Process Payroll form to enter time sheet information, calculate the payroll, finalize the payroll, run the Payroll Validation Report, update employee and payroll records, review/download errors and warnings, and print the vouchers. For example:

Using the Processing Payroll Panels
The Process Payroll form displays four distinct panels:
| Selected Payroll |
Includes additional information about the payroll batch and related available actions. In addition, you can select Payroll Validation Report to run the report prior to processing payroll or select the Payroll Maintenance menu to access quick links to other forms, such as the Payroll Control form, for the selected payroll.
Select the Payroll Maintenance menu to access the following options and their associated forms:
|
•
|
Bill Pending: Opens the Bill Pending form, where you can add billing items to a payroll |
|
•
|
Payroll Approval: Opens the Payroll Approval form, where you can review and approve the selected payroll |
|
•
|
Payroll Control: Opens the Payroll Control form, where you can establish essential information for processing payroll |
|
•
|
Tax Calculation Overrides: Opens the Tax Calculation Overrides form, where you can temporarily override how the system calculates taxes for an employee |
|
•
|
Payroll Variance Analysis: Opens the Payroll Variance Analysis dashboard, where you can review relevant payroll information and compare two payrolls on a single dashboard to simplify the review process. |
Note: Any updates you save in other forms immediately display when you return to the Process Payroll form.
Note the following:
|
•
|
If you are processing a Pay On-Demand payroll for an employee, all HSA and HSA matches are suppressed. Also, the system ignores any entries in the Minimum ACH Window field on the System Parameters form. |
|
•
|
The system displays the table header "Employees" for manual payroll types. If the payroll type is not manual, it displays "Pay Groups" as the table header. |
|
•
|
The Payroll Maintenance menu does not display if the user has no access to all the forms available as quick links. |
|
•
|
If a user's role is set to Inquiry for the forms available as quick links, that user can click these links but is unable to make updates in the forms. |
|
•
|
If a user's role is set to Deny for the forms available as quick links, these links do not display. |
|
| Processing Steps |
Guides you through the payroll process by displaying which parts of the process are complete. (Click the icon next to an uncompleted step to proceed.) After you click an icon, the associated form or processing dialog displays where you can update or view information to complete the step. For example, when you click the Time Sheet icon ( ) the Time Sheet Entry form displays, where you can finalize this step. (Note: Click Return to return to the Process Payroll form.) ) the Time Sheet Entry form displays, where you can finalize this step. (Note: Click Return to return to the Process Payroll form.)
After you successfully complete a step and return to the Process Payroll form, the system dims the step and displays "Complete." The system highlights the next step, so you can continue the process.
In addition, if there are any pending approvals for the payroll you can select Pending Actions to view pending approvals for you, pending approvals for others, and pending backdated leave requests. (Backdated leave requests are those whose dates occur before the current timesheet's pay period start date.)
Note: The system uses Restartable Payroll as the default payroll process, which replaced the Legacy Payroll process. The Restartable Payroll process picks up the calculation process when the last successful employee is calculated. (The Legacy Payroll process is still available, if you need to resolve payroll issues. However, if you need to use the Legacy Payroll process, you must enable the LEGACY-PAYROLL-GLOBAL custom feature code on the System Parameters form.)
In addition, when processing payrolls where the Maximum ACH Amount is set on the Control tab in the Client Details form, the Restartable Payroll and Legacy Payroll features prevent submitted payrolls (those whose status is set to INITPEND), that exceed a set ACH amount, from processing until they are approved by a Billing Representative. These submitted payrolls are those where the payroll processor clicks Yes when the "You cannot make any changes once you submit payroll for processing. Are you sure you want to submit?" message displays. (Note that this message does not display when payrolls are submitted in SuperBatch.)
|
| Payroll Overview |
Displays multiple views and filtering options to filter the employee table, which provides a high-level view of the selected payroll. To complement the data tables, charts display to help visualize the data. You can filter both the charts and the tables by using the drop-down menus, or by clicking the bars in the chart. In addition, you can search for employees and select an option on the Actions menu to update employee records directly from this panel.
Note: Each time you select a different filter, the system refreshes the information that displays in the chart and the employee table.
Use the following options to filter information in the Payroll Overview panel:
|
•
|
View: Select the view to display in the first menu. For example, select Employees in Payroll (default) to view the employees in the selected payroll batch. Selecting Payroll Summary displays the employee vouchers associated with the selected payroll batch. |
Note: You can only use Employee search to search for information that displays in the table.
|
•
|
Categories: In the second menu, select the category to display (default is Status/Type for Employees in Payroll and Check/Deposit for Payroll Summary). For example, select Locations for the Employees in Payroll category to filter employees by their locations. |
|
•
|
Filter: In the third menu, All (default) displays all the items that pertain to the selected category. For example, if you select Locations in the category menu and All as the filter, all the employee locations display. |
Note: The Variable Salary filter option only displays if the VARSALMETHOD custom feature code is enabled on the System Parameters form.
|
•
|
Review: Select the review type, which opens the associated form. For example, if you select Payroll Vouchers, the Payroll Summary form opens for the selected payroll batch. |
|
•
|
Charts: Select a bar in the chart to display the employees in the table below that pertain to that category. (The system dims the other bars.) To remove a bar from the chart display, select that bar in the legend. (The system dims it in the legend.) To redisplay it, simply click the dimmed item in the legend. (Note: Selecting items in the legend only affects the display in the chart and does not affect the table data.) |
|
•
|
Employee search box: To perform a search, enter the employee name or ID, then press Enter or Tab, or click the search icon ( ). The results display in the table below the search box, including the employee name and ID, status/type, and pay group. ). The results display in the table below the search box, including the employee name and ID, status/type, and pay group. |
Note: If you select Payroll Summary in the first View drop-down menu and then perform a search, the system updates the totals count and gross pay in the results.
|
•
|
Actions: Select an option to update employee records, which opens the associated form. The Actions menu displays while Employees in Payroll is selected in the Payroll Overview panel. For example, if you select Pay Rate Change, the Pay Rate Change form opens for the selected employee. |
Note the following:
|
•
|
If a user's role is set to Deny for both the Pay Rate Change form and the Employee Termination form, when they click the Actions menu a message displays, "No actions available. Contact your administrator." |
|
•
|
If a user's role is set to Deny for either form, then that option does not display on the Actions menu. |
|
| Errors and Warnings |
Displays errors and warnings, which helps you address issues that prevent payroll processing from completing. Click the download icon ( ) to download these messages to a .CSV file. For example, a warning message displays when calculating payroll if an employee has a gross pay greater than zero but has zero net pay, "Warning: Employee <Employee ID> Voucher <number> has gross pay with zero net pay." ) to download these messages to a .CSV file. For example, a warning message displays when calculating payroll if an employee has a gross pay greater than zero but has zero net pay, "Warning: Employee <Employee ID> Voucher <number> has gross pay with zero net pay."
Note the following:
|
•
|
All errors and warnings that occur during and after payroll process calculation display the employee's last name, preferred name instead of their last name, first name, if applicable. (If the employee does not have a preferred name, then their last name, first name displays.) |
|
•
|
You cannot process a payroll that contains a deidentified employee. An error message displays, "Employee: <employee ID> can not be paid as they are de-identified." Remove the deidentified employee and process the payroll again. |
|
Processing a Payroll
The steps involved in processing a payroll are:
Payroll Calculation Logic
The payroll calculation process includes the gross wages and calculates the employee contribution based on the Benefit Rules and value assigned to the Benefit Plan for Gross % of Wages.
On the Benefit Rules form, if a benefit plan uses the Percent of Gross Wages value, then while calculating the contribution towards the Employee portion of premium, if Max Contribution has been defined for any Benefit Rule, then it will ignore the Max Contribution value. You must also set The Contribution rule amounts made by Company or Employee field to Employee for the payroll process to include gross wages.
The logic to determine the Percent of Gross Wages being used is as follows:
|
•
|
If the Employee Benefit Rule Overrides form uses the Percent of Gross Wages value, then: |
|
•
|
the value in the Percent of Gross Wages field on the Employee Benefit Rule Overrides form will be used to calculate the Percent of Gross Wages or else it will use the value assigned on the Group Benefit Plans form to calculate Percent of Gross Wages. |
|
•
|
If the Employee Benefit Rule Overrides form does not use the Percent of Gross Wages value, then: |
|
•
|
the value in the Percent of Gross Wages field on the Benefit Rules form will be used to calculate the Percent of Gross Wages or else it will use the value assigned on the Group Benefit Plans form to calculate Percent of Gross Wages. |
The payroll calculation is as below:
|
•
|
Once the Percent of Gross Wages value has been determined, this value is used to calculate the Contribution Amount for the Employee portion of the premium. |
|
•
|
If the Percent of Gross Wages value is not being considered, then the Contribution Amount is calculated for the Employee portion of the premium based on the Benefit Rule grid. |
|
•
|
If the Percent of Gross Wages value is less than the Calculated Contribution from the Benefit Rule grid, then the Percent of Gross Wages is used as the contribution towards the Employee portion of premium. The dependent premium is calculated in full by the benefit rule. |
|
•
|
If the Percent of Gross Wages value is greater than the Calculated Contribution from the Benefit Rule grid, then the Calculated Contribution is used from the Benefit Rule grid as the contribution towards the Employee portion of premium. |
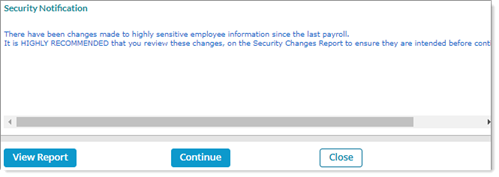
Understanding the Security Dialog
The Security Notification dialog warns clients of changes made to sensitive employee information prior to calculating payroll. This dialog displays when you:
|
1.
|
Edit employee information, such as: |
Note: This dialog displays updates made to an employee's mobile phone number as listed on the form's Address tab.
|
2.
|
Navigate to . Click the Calculate icon ( ). The Security Notification dialog displays. ). The Security Notification dialog displays. |
|
3.
|
Click View Report. The Security Changes Report displays, which provides a listing of changes to employees' employment status and includes changes made to any new or existing employee records. |
Note: To ensure "self-service payroll" Worksite Managers and Worksite Trusted Advisors have access to the Security Notification dialog, set up the following qualifications on these forms:
|
•
|
Client|Change|Client Payroll form: Enable the Self-Service Payroll field on this form's Payroll tab to set the client to self-service mode |
|
•
|
System|Change|Users form: Enable the user as a Payroll Processor in the Human Resource Roles panel, in addition to having access to process payroll in self-service mode |
Payroll Warning for Flat Amount Creditor Garnishment
When you process a manual or a special payroll where any employee has a flat amount as a garnishment which is not for child support, a warning indicating the Employee ID and the docket number displays, so you can review and make adjustments as needed. For example:

Note: This will work only if the Enhanced Garnishment Capping field in the System Parameters form is checked.
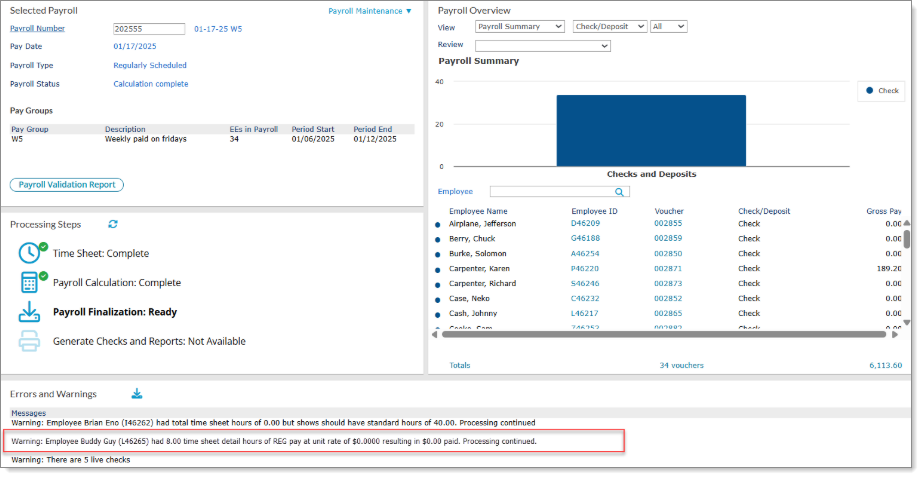
Payroll Warning for Pay Code Included in Timesheet Entry with Zero Dollar Rate
When you process a payroll where a timesheet entry contains hours greater than zero (0) and a 0.0000 unit rate, which results in $0.00 being paid for the time sheet entry, a calculation warning displays in the Process Payroll and SuperBatch forms. For example:
Note the following:
|
•
|
This warning does not stop the payroll from processing. |
|
•
|
This warning is visible to all user types using either the Restartable Payroll feature or the Legacy Payroll feature. |
Payroll Warning for Retirement Plan that has one or more Deduction Types flagged as Prohibited
When an employee is enrolled in a Retirement Plan that has one or more Deduction Types flagged as Prohibited on the Retirement Plans form and an employee’s existing elections in that plan reflect a deferral of the prohibited Deduction Type, then while initializing a payroll for that employee, a warning message, "<Employee name> has retirement elections in <Plan ID> prohibited by the plan setup. Deductions will not be taken." displays. For example:

Note: On the System Parameters form, under the Global Codes Setup section, if the Employer Match Billing Code is configured and at the same time a Retirement Plan is configured for the Employer Match Bill Code with the Prohibit Billing checkbox selected, then the payroll process ignores the global bill code and does not produce any employer match billing for the plan in the payroll.
