Creating a Third Party Check Processing Batch
Use the Third Party Check Process form to select an employer and create a batch of third party checks to process. For example, you can select the employer in this form as part of the third party check processing batch process:
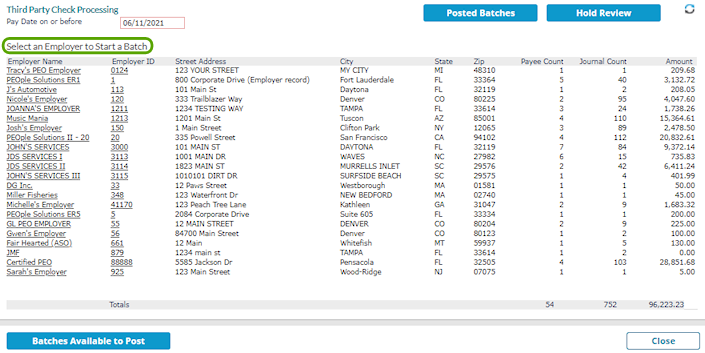
Note: When you open this form, the system locks third party check processing until you close it. Also, if you set the Third Party Check Printing Mode to Real Time on the System Parameters form, a message displays, "This account is set up to print Third Party Checks during payroll processing. If Third Party Checks should be processed in 'Batch Mode,' change the Third Party Check Printing mode at System Parameters." Click OK.
The Third Party Check Process form serves as the main "hub" for some third party check processing transactions. In addition to creating a third party check processing batch, you can also do the following in this form:
| • | View posted batches by clicking Posted Batches (see Viewing Posted Third Party Check Batches) |
| • | Manage transactions on hold by clicking Hold Review (see Managing Transactions On Hold) |
| • | View third party check processing batches that are ready to post to the system and then post batches by clicking Batches Available to Post (see Posting a Third Party Check Processing Batch) |
Important! Before you begin this process, you must set the Third Party Check Print Mode field to Batch Mode on the System Parameters form.
To select an employer and create a batch of third party checks to process, do the following:
| 1. | Click Back Office |
| 2. | If necessary, enter the pay date in the Pay Date on or before field to limit the list to payroll batches that were processed for that date or earlier. (The default is the Friday of the current week.) |
| 3. | To begin creating a batch of third party checks, click the Employer Name or Employer ID. This opens the Third Party Check Batch Control form, where you can create a batch. To apply filters, select the + sign next to Batch Creation Filters to expand the form. |
Note: If the net payee amount was less than or equal to zero, the following message displays when the Third Party Check Batch Control form opens, "Some items were skipped because the net payee amount was less than or equal to zero."
| 4. | Complete the appropriate information: |
| Field | Description | |||||||||
|---|---|---|---|---|---|---|---|---|---|---|
| Check Date | Enter or select the Check Date. | |||||||||
| Checking Account | Enter or select the Checking Account. (Note: You can set up a separate checking account only for third party check processing, but this is not a requirement.) | |||||||||
| Batch Name | Enter the Batch Name. | |||||||||
| Batch Creation Filters |
Use the filters, if you need to limit the items in the third party check processing batch:
Note: If you select a Filter option, such as Payee, add some payees, but then decide not to use them and switch to the Client or Employee options and then select Payee again, the system remembers and displays the payees you originally added. (This behavior also applies to the Pay Date on or before date and the Check Type filter.) Note: Select Clear Filters to remove any filters you selected. |
The following example displays third party (voluntary deductions) check transactions (labeled "Third" in the Check Type column) for a particular client:

Note: Garnishment transactions are labeled "Garn" in the Check Type column.
| 5. | To view the details of a line item, click the |
| 6. | When the list displays only the third party check transactions that you want to include, click Create Batch. |
The system displays a message with the ID of the batch that you created.
| 7. | Click OK to return to the main Third Party Check Process form. |
