Setting Up Employee Time Off
You can use the Set Up Plans form to create or update the employee time off accrual schedule, plan, pay, and portal configuration.
Note: The Set Up Plans form displays as part of step 2 in the Time Off Setup Workflow process, which is accessible when you select a time off type in the Time Off Type form and click  (see Setting Up Time Off Plans). (This form cannot be accessed in the search menu and cannot be added to a user role. See Using the Time Off Setup Workflow Process.)
There are four panels in the Set Up Plans form:
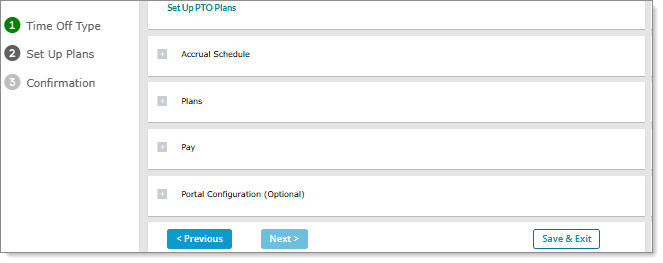
You can do the following in these panels:
| • | Setting Accrual Schedule: Use the Accrual Schedule panel to set when employees accrue time off. |
| • | Setting Up Employee Accrual Time Off Plan: Use the Plans panel to set up the plan that determines how much time off employees will accrue. |
| • | Setting Pay Information: Use the Pay panel to set the pay information for the time off type, which includes setting the Pay Code and Accrual Schedule. |
| • | Setting Portal Configuration: Use the Portal Configuration (Optional) panel to indicate whether an employee can submit a time off request in Employee Portal (EP). (All settings in this panel are optional.) |
Note the following when working in the Set Up Plans form:
| • | You cannot access the Set Up Plans form in the search menu and or add this form to a user role. |
| • | Clicking in the Time Off Type form incorporates the time off type's description in the header that displays at the top of the Set Up Plans form (that is, Set Up <Time_Off_Type_Description> Plans). For example, if you select the "PTO Accrual" type, the header displays as "Set Up PTO Accrual Plans." |
| • | You can move through the panels without selecting any settings. However, you must complete all the required fields in the panels before moving on to step 3, the Confirmation form. (The button is disabled until you complete this step.) |
Navigating in the Set Up Plans Form
Use the buttons in the Set Up Plans form to do the following:
| Click | Action |
|---|---|
|
|
Opens a panel. |
|
|
Collapses an open panel. |

|
Saves the information in the current open panel, then closes that panel and returns to the panel above. |

|
Saves the information in the current open panel, then closes that panel and advances to the next panel in the form. For example, if you click in the Accrual Schedule panel, the Plans panel opens. (You can advance to the next panel even if all the fields in the open panel are not complete.) |

|
Returns to the Time Off Type form. |
|
|
Advances to the Confirmation form, which is step 3 in the Time Off Setup Workflow process. Note: You must complete all the required fields in the panels before moving on to step 3, the Confirmation form. (This button is disabled until you complete those fields.) |

|
Saves your information and returns to the Time Off Setup Workflow form. |

Setting Accrual Schedule
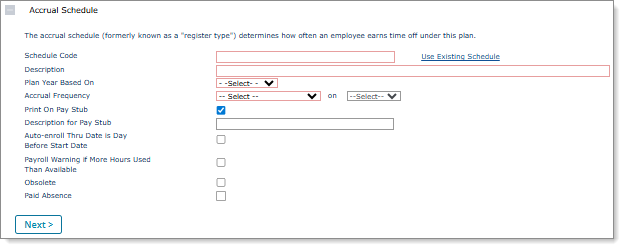
Use the Accrual Schedule panel to set when employees accrue time off. (This panel defaults to open.) For example:
Note the following when working in the Accrual Schedule panel:
| • | You cannot change data after the system populates it in this panel. |
| • | Select Create New Schedule to remove populated data and create a new accrual schedule. |
| • | If you create a new time off plan (see Setting Up Time Off Plans) and select an existing Schedule Code for the accrual schedule a warning displays, "<Code> is an existing Accrual Schedule and cannot be changed." |
To set the accrual schedule for a time off type:
| 1. | Click the Client menu. |
| 2. | From Client|Change, select Time Off Setup Workflow. The Time Off Setup Workflow form opens. |
| 3. | Select the time off plan in the Batch ID column where you need to set the accrual schedule. The Time Off Type form displays. |
| 4. | Select the Time Off Type from the options that display (the type description displays in highlighted text with the type name displaying underneath) and click . The Set Up Plans form displays using the title of the time off type you selected. For example, Set Up PTO Accrual Plans. |
| 5. | Complete the following: |
| Field | Description | ||||||||||||||||||||||||||||||||||||||||||||||||
|---|---|---|---|---|---|---|---|---|---|---|---|---|---|---|---|---|---|---|---|---|---|---|---|---|---|---|---|---|---|---|---|---|---|---|---|---|---|---|---|---|---|---|---|---|---|---|---|---|---|
| Schedule Code |
Enter a unique Schedule Code for this accrual schedule. For example, V for vacation, S for sick, or P for personal time. (Required.) Note: Click Create New Schedule to select a new accrual schedule for this time off type. |
||||||||||||||||||||||||||||||||||||||||||||||||
| Description | Enter a description for the accrual schedule. (Required.) | ||||||||||||||||||||||||||||||||||||||||||||||||
| Plan Year Based On |
Select the plan year that this accrual schedule tracks, such as Fiscal. (Required.) |
||||||||||||||||||||||||||||||||||||||||||||||||
| Last Day of Fiscal Year |
If the Plan Year Based On is Fiscal, enter the Last Day of Fiscal Year when each fiscal year ends. Note: The Accrual Frequency and on fields work together to determine when an accrual occurs and through which date the accrual calculates. |
||||||||||||||||||||||||||||||||||||||||||||||||
| Accrual Frequency |
Select the accrual calculation that triggers during payroll processing. (Required.)
Note: A warning message displays when you select End of Quarter, "Warning: Flat amount is the only Plan Accrual Method supported by End of Quarter Accrual Frequency. The Year End Basis must also be Fiscal Year ending on 6/30." Click OK to continue.
Note the following:
Note: This option is available only when you set the Plan Year Based On to Anniversary. |
||||||||||||||||||||||||||||||||||||||||||||||||
| on |
Select the date through which the accrual calculation is triggered. The options vary based on the selected Accrual Frequency. |
||||||||||||||||||||||||||||||||||||||||||||||||
|
Print On Pay Stub |
Select if balances for this accrual schedule should print on employees’ payroll check stubs. |
||||||||||||||||||||||||||||||||||||||||||||||||
|
Description for Pay Stub |
Enter a name to describe the time off accrual schedule. This will appear on each employee’s payroll check stub and certain reports. |
||||||||||||||||||||||||||||||||||||||||||||||||
|
Auto-enroll Thru Date is Day Before Start Date |
Select to force the accrued through date to be the day before the start date when auto-enrolling employees in plans for this accrual schedule. This can help to ensure that auto-enrolled employees do not lose accrual for that day. |
||||||||||||||||||||||||||||||||||||||||||||||||
|
Payroll Warning if More Hours Used Than Available |
Select to display a warning during payroll initialization if an employee uses more hours than currently available. |
||||||||||||||||||||||||||||||||||||||||||||||||
|
Obsolete |
Select if this accrual schedule is no longer used. The system will not calculate accruals or update existing employee registers. |
||||||||||||||||||||||||||||||||||||||||||||||||
|
Paid Absence |
Select to indicate that this Accrual Schedule is for tracking paid absences. (This option is for informational purposes only.) |
| 6. | Do one of the following: |
| a. | Click in the Accrual Schedule panel to open the Plans panel and complete those settings. |
| b. | Click to save the accrual schedule settings and return to the Time Off Setup Workflow form. |
Setting Up Employee Accrual Time Off Plan
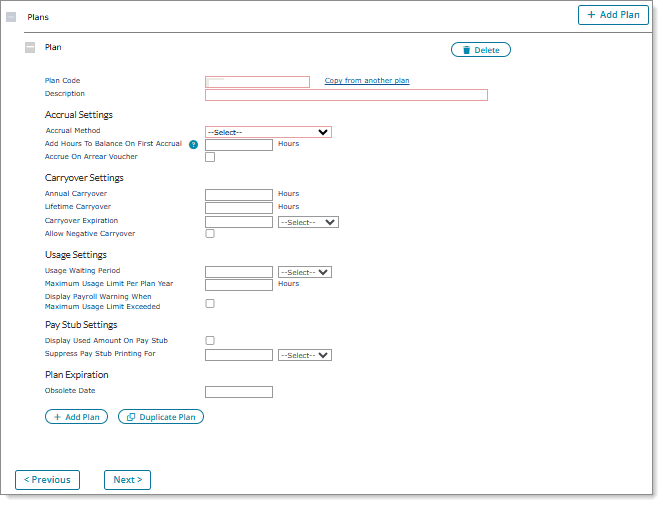
Use the Plans panel to set up how much time off employees accrue. (You can set up multiple plans, such as a full-time plan and a part-time plan.) For example:
Use the buttons in the Plans panel to do the following:
| Click | Action |
|---|---|

|
To create a new plan. A blank plan opens below the current open plan. (This button is located at the bottom of the panel, so you can easily add another plan without scrolling up to the  button at the top of the panel if you have many plans open.) button at the top of the panel if you have many plans open.) |

|
To create a duplicate plan of the current open plan (displays beneath it), so you can use that plan's selections to quickly set up another plan. |
|
|
To create a new plan, which displays as a blank plan below the current open plan. (This button is located at the top of the panel.) |

|
To delete the selected plan. After clicking a warning message displays, "Are you sure you want to delete this plan?" Click Yes to continue. |
To set up the employee accrual time off plan:
| 1. | If the Plans panel is not open, click the plus sign ( ) to open it. ) to open it. |
| 2. | Complete the following: |
| Field | Description | ||||||
|---|---|---|---|---|---|---|---|
| Plan Code |
Enter a unique code for this plan. Note: To reuse information from an existing plan, select Copy from another plan. |
||||||
| Description | Enter a description for this plan. | ||||||
| Accrual Method |
Select the Accrual Method used to accrue paid time off. Additional fields become available based on this selection. Note: For more information about the Flat Amount by Hours Worked option, see Defining Flat Amount by Hours Worked. |
||||||
| Add Hours To Balance On First Accrual |
Enter a flat amount to add on the accrual balance when the first accrual triggers for any employee assigned to this time off plan. Note: This amount only applies to plans with an Accrual Method of Flat Amount, Flat Amount by Hours Worked, or Months Worked. (Plans that use other Accrual Method options will display Add Hours To Balance On First Accrual as read-only.) |
||||||
| Accrue On Arrear Voucher | Select if hours should accrue on arrearage vouchers. | ||||||
| Annual Carryover |
Enter the maximum number of unused hours that employees can carry over from one year to the next. Note: If the client’s employees cannot carry over unused Time Off hours, enter 0 in the Annual Carryover field. If there is no maximum number of hours, enter 9999.99. |
||||||
| Lifetime Carryover | Enter the maximum number of unused hours that employees can carry over for the duration of their employment. This includes all plan years, starting from each employee’s start date. | ||||||
| Carryover Expiration | Enter the number of days, months, or pay periods after the beginning of a new year that any unused carryover hours expire. Leave this field blank if hours do not expire. | ||||||
| Allow Negative Carryover | Select if employees’ negative hours can carry over from one year to the next. | ||||||
| Usage Waiting Period |
Specify a usage waiting period to suppress employees’ accrued time off until after the specified period of time after their original hire date. Using the field and the drop-down, enter the number of hours, days, or months until employees can request time off, if appropriate for this time off plan. (This must be a whole number.) Note: Accrued time off will not display as available on pay stubs/advices until that many hours, days, or months have passed since their original hire date. If an employee leaves the company and is then rehired, the system uses the original hire date, not the rehire date. |
||||||
| Maximum Usage Limit Per Plan Year | Enter the maximum use limit per register year that the employee can use. | ||||||
|
Display Payroll Warning When Maximum Usage Limit Exceeded |
Select if the system must stop the calculation/initialization step of the timesheet process when one or more employees exceed the Max Usage Limit Per Plan Year. |
||||||
|
Display Used Amount on Pay Stub |
Select this setting to display, on the memo line of the employee pay stub, the hours that the employee already used (year-to-date). Use this field to comply with California's COVID-19 sick leave requirements for 2022. To use this setting, you must have Print On Check enabled for the corresponding accrual schedule. Note the following:
|
||||||
|
Suppress Pay Stub Printing For |
Suppress printing on pay stubs. Enter the number of days or months (from the time off start date) to suppress printing the time off balance of this plan on each payroll check stub and to suppress the display in Employee Portal. From the list, select Days or Months. |
||||||
|
Obsolete Date |
Enter the plan expiration date. After this date, no paid time off accrues for this plan. |
| 3. | Do one of the following: |
| a. | Click in the Plans panel to open the Pay panel and complete those settings. |
| b. | Click to save the plan settings and return to the Time Off Setup Workflow form. |
Defining Flat Amount by Hours Worked
Define Flat Amount by Hours Worked as the Accrual Method for plans using the Flat Amount per Hours Worked panel.
To define flat amount by hours worked:
| 1. | In the Accrual Method field in the Plans panel, select Flat Amount by Hours Worked to view the Flat Amount per Hours Worked panel. |
| 2. | Accrue a flat (a) hours for every (b) hours worked: |
| a. | Enter the flat number of hours that employees accrue. |
| b. | Enter the number of hours that employees must work to accrue that flat amount. |
| 3. | Enter the flat number of hours that employees must work to start accruing leave in the Begin accruing hours AFTER ___ hours worked field. (This field is associated with the Nebraska Healthy Families and Workplaces Act, in effect as of October 1, 2025.) |
Note: Accruals differ depending on whether you enable If the actual hours worked are not an even multiple of the hours worked then accrue a fraction of the accrual hours.
| 4. | To indicate whether the system should accrue a fraction of hours if the time off actual hours worked are not an even multiple of the hours worked that you entered, enable If the actual hours worked are not an even multiple of the hours worked then accrue a fraction of the accrual hours. |
| 5. | Complete the following: |
|
Use this option |
To do this |
|---|---|
|
Maximum Amount Accrual Per Year |
Enter the maximum number of hours accrued per year. |
|
Apply Carryover Toward Maximum Amount Accrual Per Year |
Enable the Apply Carryover Toward Maximum Amount Accrual Per Year field to allow employees who work at qualified Colorado and Maine employers to carryover accrued leave. (There are yearly maximums on the accrued leave.) Note: Employees will stop accruing time off when the carryover hours plus the accrued hours reach the Maximum Amount Accrual Per Year value. |
|
Stop Accrual if Balance Reaches |
Enter the number of hours the system stops accruing hours. |
|
Apply Current Hours Taken Before Applying Stop-Balance Limits |
Subtract the hours used before applying a stop-balance limit. If you do not select this option, the system ignores the hours used. |
Setting Pay Information
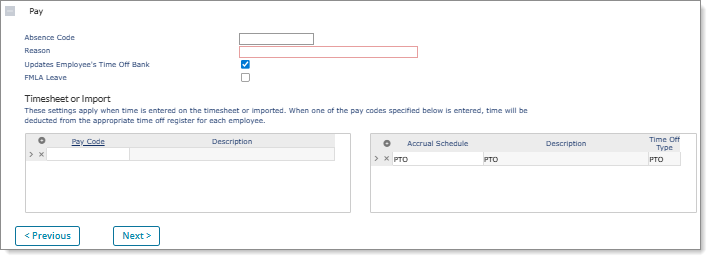
Use the Pay panel to set the pay information for the time off type, which includes setting the Pay Code and Accrual Schedule. (You must enable Updates Employee's Time Off Bank to display the Accrual Schedule field.) For example:
To set the pay information for a time off type:
| 1. | If the Pay panel is not open, click the plus sign () to open it. |
| 2. | Complete the following: |
| Field | Description | ||||||||||||
|---|---|---|---|---|---|---|---|---|---|---|---|---|---|
| Absence Code |
Enter a brief, descriptive code that represents the absence type, such as SICK for an employee illness. Note: An error displays if you enter an existing Absence Code, "<Code> is an existing Absence Code." |
||||||||||||
| Reason |
Enter a descriptive reason for the absence (required), such as Sickness. This reason displays on the absence report. |
||||||||||||
|
Updates Employee's Time Off Bank |
Select whether to post the hours using this absence code to employee's time off bank.
Note: If the absence type accrues time, it will update the employee's time off bank in order to keep track of the hours an employee has taken, such as vacation and sick time. Some absence codes, such as jury duty or bereavement, may not update an employee's time off bank. |
||||||||||||
|
FMLA Leave |
Select for an absence that is a Family Medical Leave Act event. |
||||||||||||
|
Pay Code/Description |
Enter a value that, when paid to employees, deducts the hours paid from the employee's time off bank for this absence code. The Pay Description displays. (These settings apply when users enter time on the timesheet or import them.) Note: You can only enter or select restricted pay codes (that is, pay codes assigned to the client in the Control tab on the Client Details form) when you select the Pay Code link. |
||||||||||||
|
Accrual Schedule/Description |
If this absence updates an employee's time off bank, enter each of the relevant Accrual Schedules. The Description displays. The system automatically populates the Accrual Schedule field with the following data from the Schedule Code field on the Accrual Schedule panel:
Note the following:
|
||||||||||||
|
Time Off Type |
Displays system-level paid time off type for accrual schedule. |
| 3. | Do one of the following: |
| a. | Click in the Pay panel to open the Portal Configuration (Optional) panel and complete those settings. |
| b. | Click to save the accrual schedule settings and return to the Time Off Setup Workflow form. |
Setting Portal Configuration
Use the Portal Configuration (Optional) panel to indicate whether an employee can submit a time off request in Employee Portal (EP). (All settings in this panel are optional.) For example:
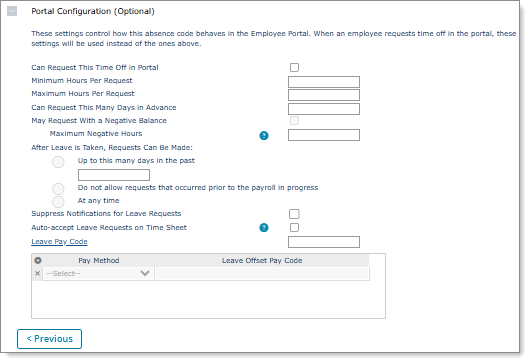
Note: These settings control how the absence code behaves in Employee Portal (EP). (Absence codes are specialized reason codes that describe the reason for employee absences.)
To set the portal configuration for a time off type:
| 1. | If the Portal Configuration (Optional) panel is not open, click the plus sign () to open it. |
| 2. | Enable the Can Request This Time Off Type in Portal field to allow employees to request time off using Employee Portal (EP). |
| 3. | Complete the following: |
| Field | Description | |||||||||
|---|---|---|---|---|---|---|---|---|---|---|
| Minimum Hours Per Request |
Enter the minimum number of hours that employees can request in advance for this absence type. |
|||||||||
| Maximum Hours Per Request | Enter the maximum number of hours that employees can request in advance for this absence type. | |||||||||
| Can Request This Many Days in Advance | Enter the maximum number of days into the future for which employees can request this type of absence. | |||||||||
| May Request With a Negative Balance | Select if employees are allowed to submit leave requests when they have a negative hours balance. | |||||||||
| Maximum Negative Hours | Enter the maximum amount of hours that an employee's balance is allowed to be in the negative when a leave request is submitted. | |||||||||
| After Leave is Taken, Requests Can Be Made |
Specify how soon a leave request can be made after an employee has completed a previous leave with one of these options:
|
|||||||||
|
Suppress Notifications for Leave Requests |
Select to suppress email notifications for leave request approvals. | |||||||||
|
Auto-accept Leave Requests on Time Sheet |
Select to have the system automatically accept approved leave requests in the timesheet, which displays a green dot in the Leave Request column. | |||||||||
|
Leave Pay Code |
Enter or select the pay code that will reduce the relevant employe time off bank. The system also uses this code on the timesheet to pay leave hours. | |||||||||
| Pay Method |
Select the following:
|
| 4. | If you completed all the required fields in the panels, click to access step 3, the Confirmation form. (See Confirming Time Off Plan Settings.) |
